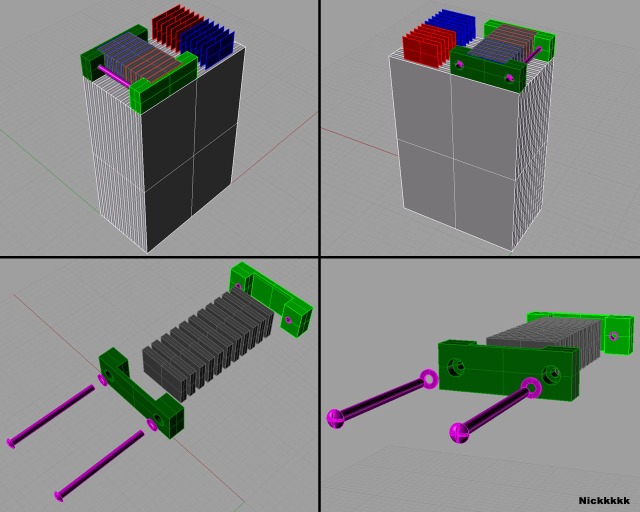
A123 battery Design 2.

OK so the last one was OK I thought but my problem with it was that before it was assembled on top of the cells it was just a bag of bits.  It’s better if the whole thing is pre-assembled and then when you come to fit it on the cells it’s just a question of tightening it.  I really don’t think you want to be there dropping bits in between the cells and fiddling around too much.  I’m also worried that when assembling it you could drop it at the wrong time and make a contact you didn’t intend.  I haven’t quite solved that problem yet though.

The colours represent the same materials as last time.

  • Light grey = A123 cell foil.
  • red = positive cell tab.
  • blue = negative cell tab.
  • dark grey = 1/4 inch thick aluminium.
  • pink/purple = screws / nordlock washers / nutserts.
  • light green = cast urethane with 2 nutserts in.
  • medium green = cast urethane with 2 drilled holes for the screws and 2 big counter sunk holes for the screw ends and nordlock washers.

Here’s the picture.  Click on it to enlarge it.

I’m not sure how easy from the picture it is to understand what’s going on.  Basically it’s the same as last time, but now the “U” shaped cast urethane pieces are facing the other way and the side blocks where the screws go are only half as tall.  The aluminium pieces have gained some tabs on each side and the tabs have holes in.  The screws go through the Cast pieces and aluminium and hold it all together.  I have decided to call the assembled thing a “cassette”.  The cassette’s interlock with each other, but to do that you have to turn one of them upside down.  Like the last design the only thing keeping the thing attached to the cell tabs is the clamping force coming from the screws.

This design is both better and worse.  It’s better to be able to pre-assemble everything, and I’m more confident you can exert a lot of force on the aluminium when you tighten the screws.  The problems are that it’s harder to make and the urethane blocks overhang the edges.

It’s a work in progress.  There must e a better way.  Onto design 3 I suppose.

[Disclaimer:  Just messing around.  I make no claim to  have  any expertise.]

Posted in Uncategorized | 4 Comments

A123 Battery Design

Hi there.

This is my attempt at designing a battery made from A123 20ah pouch cells.  This is basically just an evolution of Jack Rickard’s (EVTV.me) 2nd design which he demonstrated on his Dec 30th 2011 show.  I thought that design was good, but that some space was going to waste.

So here’s my design so far:

(Click to enlarge)

  • Light grey = A123 cell foil.
  • red = positive cell tab.
  • blue = negative cell tab.
  • dark grey = 1/4 inch thick aluminium.
  • pink/purple = screws / nordlock washers / nutserts.
  • light green = cast urethane with a 2 nutsert in.
  • medium green = cast urathane with 2 drilled holes for the screw and 2 big counter sunk holes for the screw end and nordlock washer.
  • Dark green = cast urathane with hole drilled through it.  Just there to make sure nothing slides around and to add a bit more insulation.

(Click to enlarge)

So the idea with this design is to save space to the point where you can just stack cells up against each other.  Instead of having big square blocks of urethane and high molecular weight polyethylene I’m instead using “U” shaped blocks.  I figured it would be simpler to just use one material, so I’m opting to just go with the urethane.  One “U” shaped piece contains a nutsert and the other has a hole for the screws as well as a counter sunk hole to accommodate the screw head and nordlock washer.

If anyone ever actually makes this then they can play with the dimensions.  In this design there is always a cells width (7.25mm) of urethane between any of the conductive metal pieces.  The U shaped pieces are half a cells width at their narrowest point and 2 cells wide at their widest point.

I’m assuming it’s possible to generate enough clamping force with this design, but of course I may be wrong.  If the urethane isn’t strong enough then you could either thicken it or cast a piece of aluminium with 2 holes for the screws in with the urethane.

This is a work in progress.  I’ll make some modifications to improve it in my next post.  I want to change it so that the clamp is together in one piece before it’s installed on the cells.  At the moment it’s just a bag of bits which won’t stay together until it’s clamped.  This is a bit of a design flaw.  I can see ways round the problem though.

Just to be clear, I don’t claim to be an expert in anything.  This is just a bit of fun.

Note:  I’m using 1/4 inch aluminium in this design and the gap between each cell tab is actually larger than that and so when it was all tightened together it wouldn’t look quite as neat as it does in the above images.   I think if I was making this I’d probably pack the empty gaps with something to make sure nothing wonders around as the car is moving.

Posted in Uncategorized | Leave a comment